本文将先介绍下java注解的实现,再说明下Flink自定义的几个注解及其使用。
java注解
注解在一定程度上是在把元数据与源代码文件结合在一起,而不是保存在外部文档中这一大的趋势下所催生的。注解可以提供用来完整的描述程序所需的信息,而这些信息是无法用Java来表达的。
因此,注解存储有关程序的额外信息,是可以由编译器来测试和验证的。注解还可以用来生成描述符文件,甚至是新的类定义,并且有助于减轻编写“样板”代码的负担。通过使用注解,我们可以将这些元数据保存在Java源代码中,并利用 annotation API 为自己的注解构造处理工具,同时注解的优点还包括:更加干净易读的代码以及编译器类型检查等。
注解的使用场景:
- 提供信息给编译器:编译器可以利用注解来探测错误和警告信息
- 编译阶段时的处理:软件工具可以利用注解信息来生成代码,HTML文档或其他相应处理
- 运行时的处理:某些注解可以在程序运行时接受代码的提取
注解的分类
按运行机制划分
源码注解:只在源码中存在,编译成 .class 文件就不存在了
编译时注解:在源码和 .class 文件中都存在,像前面的 @Override、@Deprecated、@SuppressWarnings 都属于编译时注解
运行时注解:在运行阶段还有作用,甚至会影响运行逻辑,像 @Autowired 就属于运行时注解,它会在程序运行时把你的成员变量自动的注入进来按来源划分
来自 JDK 的注解
来自第三方的注解
自定义注解元注解
元注解
负责注解的创建,是注解的注解。
元注解的类图关系如下: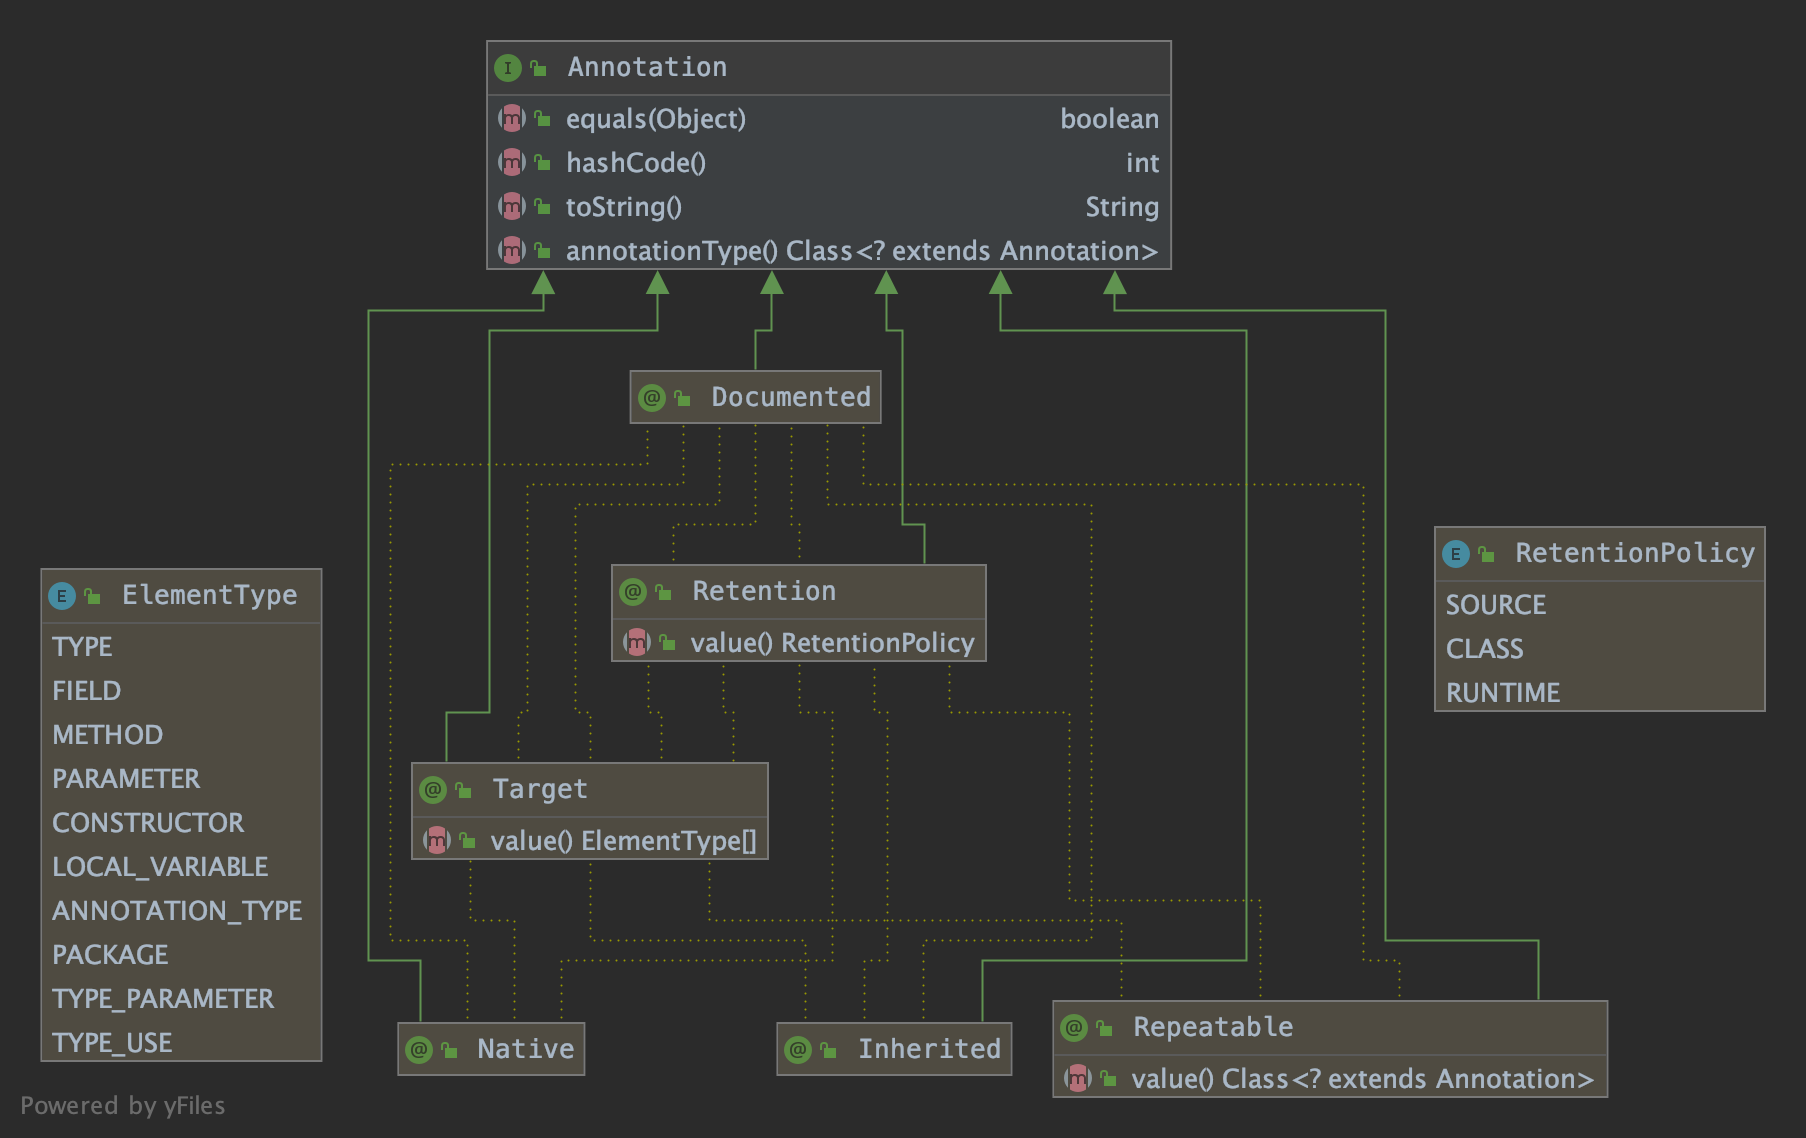
- @Target
表示注解可以用在什么地方。ElementType可以是:
- TYPE:类,接口,枚举类上
- FIELD:字段上,包括枚举实例
- METHOD:方法上
- PARAMETER:参数前
- CONSTRUCTOR:构造函数上
- LOCAL_VARIABLE:局部变量上
- ANNOTATION_TYPE:注解类上
- PACKAGE:包上
- TYPE_PARAMETER:
- TYPE_USE:
可以是某一个值或者以逗号分隔的形式指定多个值,如果想要将注解应用于所有的ElementType,也可以省去 @Target 元注解
1 |
|
- @Retention
表示需要在什么级别上保留该注解信息。RetentionPolicy可以是:
- SOURCE:注解将被编译器丢弃
- CLASS:注解在class中可用,但会被VM丢弃
- RUNTIME:VM在运行期也将保留注解,因此可以通过反射机制读取注解信息
1 |
|
- @Documented
将此注解中的元素包含到javadoc中。
1 |
|
- @Inherited
允许子类继承父类的注解。
1 |
|
- @Repeatable
注解的值可以是多个,元素是一个容器注解。
1 |
|
注解元素
- 基本语法
使用 @interface 关键字定义注解,在注解上添加元注解。一般还要为注解添加元素,没有元素的注解称为标识注解。
注解只有成员变量,没有方法。注解的成员变量在注解的定义中以”无形参的方法”形式来声明,其方法名定义了该成员变量的名字,返回值定义了该成员变量的类型。
1 | (RetentionPolicy.RUNTIME) |
- 注解元素可用的类型
- 所有基本类型(int,float,boolean等)
- String
- Class
- enum
- Annotation
- 以上类型的数组
如果使用了其他类型,那编译器就会报错。也不允许使用任何包装类型。注解也可以作为元素的类型,也就是说注解可以嵌套。
- 注解元素的默认值限制
编译器对注解元素的默认值有些过分挑剔。首先,注解元素不能有不确定的值。也就是说,注解元素要么具有默认值,要么在使用注解时设置元素值。
内置注解
所有的注解都继承自 java.lang.annotation.Annotation 接口。
1 | public interface Annotation { |
JDK 中有几种内置的注解: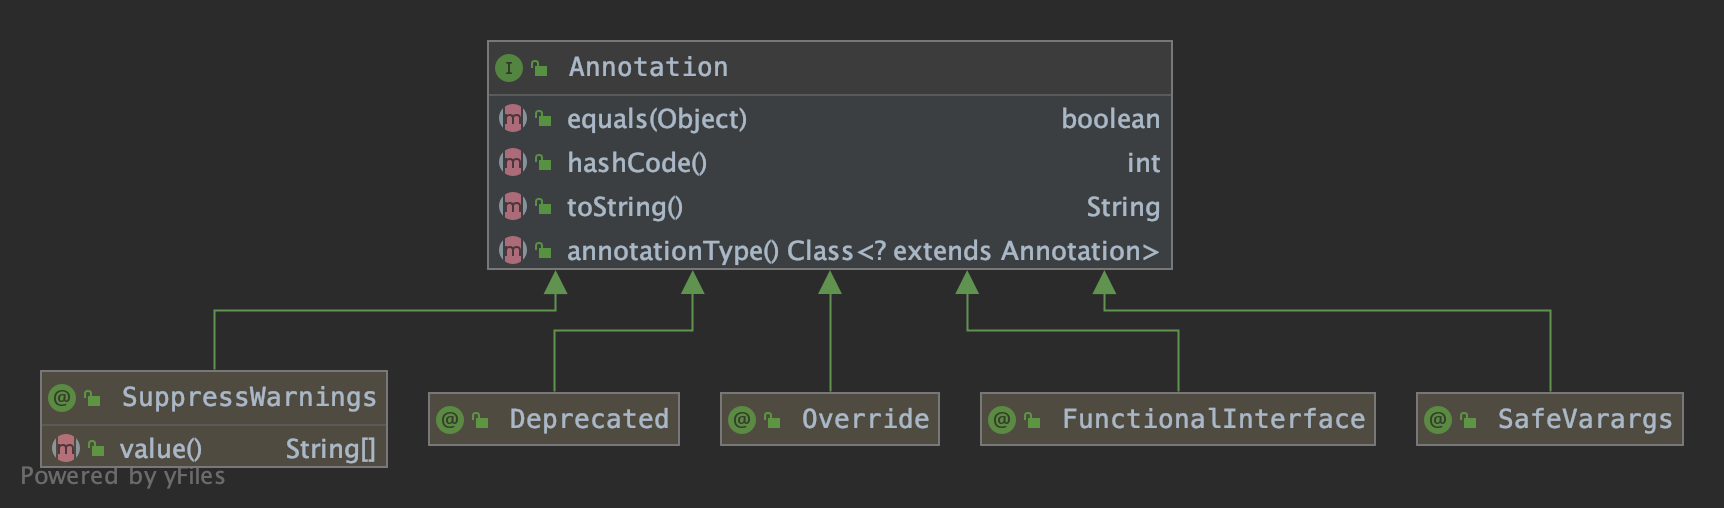
- @Override
表示当前的方法定义将覆盖超类中的方法。如果不小心拼写错误或者方法签名对不上被覆盖的方法,编译器就会发出错误提示。
1 | package java.lang; |
执行如下命令:
1 | javac Override.java |
得到如下内容:
1 | Compiled from "Override.java" |
由此可以看出,注解的本质就是一个继承了 Annotation 接口的接口,是一种典型的标记式注解。
一旦编译器检测到某个方法被修饰了 @Override 注解,编译器就会检查当前方法的方法签名是否真正重写了父类的某个方法,也就是比较父类中是否具有一个同样的方法签名,如果没有,自然不能编译通过。
编译器只能识别已经熟知的注解类,比如 JDK 内置的几个注解,而我们自定义的注解,编译器是不会知道这个注解的作用的,当然也不知道应该如何处理。
- @Deprecated
依然是一种标记式注解,永久存在,可以修饰所有类型,被标记的类、方法、字段等已经不再被推荐使用了,可能下一个版本就会删除。当然,编译器并不会强制要求你做什么,只是会在对象上画出一道线,建议你使用某个替代者。
1 |
|
- @SuppressWarnings
抑制告警。它有一个 value 属性需要主动传值,传入需要被抑制的警告类型。
1 | ({TYPE, FIELD, METHOD, PARAMETER, CONSTRUCTOR, LOCAL_VARIABLE}) |
如下 Date 的构造函数是过时的,在 main() 方法上加上 @SuppressWarning(value = “deprecated”) 注解后,编译器就不会再对这种告警进行检查了。
1 | (value = "deprecated") |
注解的提取
解析一个类或方法的注解往往有两种形式:
- 一种是编译期直接扫描:编译器在对java代码编译字节码的过程中会检测到某个类或方法被一些注解修饰,它就会对这些注解进行某些处理。
- 一种是运行期反射。
上文中有创建注解 TestAnnotation ,下面我们来写一个注解的提取类 Test:
1 | ("defaultValue") |
我们前面说过,注解本质上是继承了 Annotation 接口的接口,而当你通过反射,也就是 getAnnotation 方法去获取一个注解类实例的时候,其实 JDK 是通过动态代理生成了一个实现自定义注解(接口)的代理类。
运行 Test 类之前,先设置如下 VM 参数,让其生成代理类 class 文件:
1 | /* jdk动态代理 设置此系统属性,让JVM生成的Proxy类写入文件.保存路径为:com/sun/proxy(如果不存在请手工创建) */ |
将生成的代理类 class 文件反编译成可视化文件:
1 | cd ./com/sun/proxy |
查看代理类内容,代理类实现接口 TestAnnotation 并重写其所有方法,包括id()、msg()、value()以及接口 TestAnnotation 从 Annotation 接口继承而来的方法。
1 | public final class com.sun.proxy.$Proxy1 extends java.lang.reflect.Proxy implements org.apache.flink.annotation.TestAnnotation { |
这里的 InvocationHandler 指的就是 AnnotationInvocationHandler,它是 Java 中专门用于处理注解的 handler,下面就来让我们看看这个类的实现:
1 | class AnnotationInvocationHandler implements InvocationHandler, Serializable { |
自定义注解
- 可重复注解
创建容器注解 Persons,容器注解本身也是一个注解,是用来存放其他注解的地方。它必须要有一个 value 属性,属性类型是一个被 @Repeatable 注解过的注解数组。
1 | public Persons { |
使用 @Repeatable 注解了 Person,而 @Repeatable 后面括号中的类是一个容器注解。
1 | (Persons.class) |
给 Superman 这个类贴上多个角色标签。
1 | (role="Painter") |
- 测试用例注解
实现一个注解,用来跟踪一个项目中的用例。如果一个方法实现了某个用例的需求,那么可以为此方法加上该注解。于是,项目经理通过计算已经实现的用例,就可以很好的掌控项目的进展。而且把实现方法和用例绑定,如果要更新或修改系统的业务逻辑,维护该项目的开发人员也可以很容易的在代码中找到对应的用例。
定义 UseCase 注解,id 表示用例编号,description 设置了默认值。
1 | (ElementType.METHOD) |
定义需求实现类 PasswordUtils,每一个方法都对应一个需求用例。
1 | public class PasswordUtils { |
如果没有用来读取注解的工具,那注解也不会比注释更有用。使用注解的过程中,很重要的一部分就是创建与使用注解处理器。
下面实现了一个非常简单的注解处理器 UseCaseTracker ,将用它来读取 PasswordUtils 类,并使用反射机制查找 @UseCase 注解。
我们提供了一组 id 值,然后它会列出在 PasswordUtils 中找到的用例,以及缺失的用例。
1 | public class UseCaseTracker { |
运行结果:
1 | Found Use Case: 47 Passwords must contain at least one numeric |
- 利用注解生成SQL语句
定义表名注解,它告诉处理器,你需要把我这个类生成一个数据库 DDL 语句。
1 | (ElementType.TYPE) |
定义数据库表字段约束的注解:是否为主键,是否可以为空,唯一性约束。
1 | (ElementType.FIELD) |
定义表字段类型为 String 的注解:字符串长度,字段名, 字段约束。这里的字段约束就用到了嵌套注解的语法。
1 | (value = ElementType.FIELD) |
定义表字段类型为 Integer 的注解:字段名,字段约束。
1 | (ElementType.FIELD) |
定义一个 Member 类,应用了以上定义的注解。类的注解 @DBTable 给定了值 MEMBER,它将会用来作为表的名字。字段属性 firstName 和 lastName 都被注解为 @SQLString 类型,并分别设置了长度为 30 和 50。
1 | (name = "MEMBER") |
实现处理器 TableCreator ,它将读取一个类文件,检查其上的数据库表注解,并生成用来创建数据库表的 SQL 语句。
1 | public class TableCreator { |
运行结果:
1 | Table.Creation SQL for org.apache.flink.annotation.dbtable.Member is : |
flink中的注解
docs相关注解
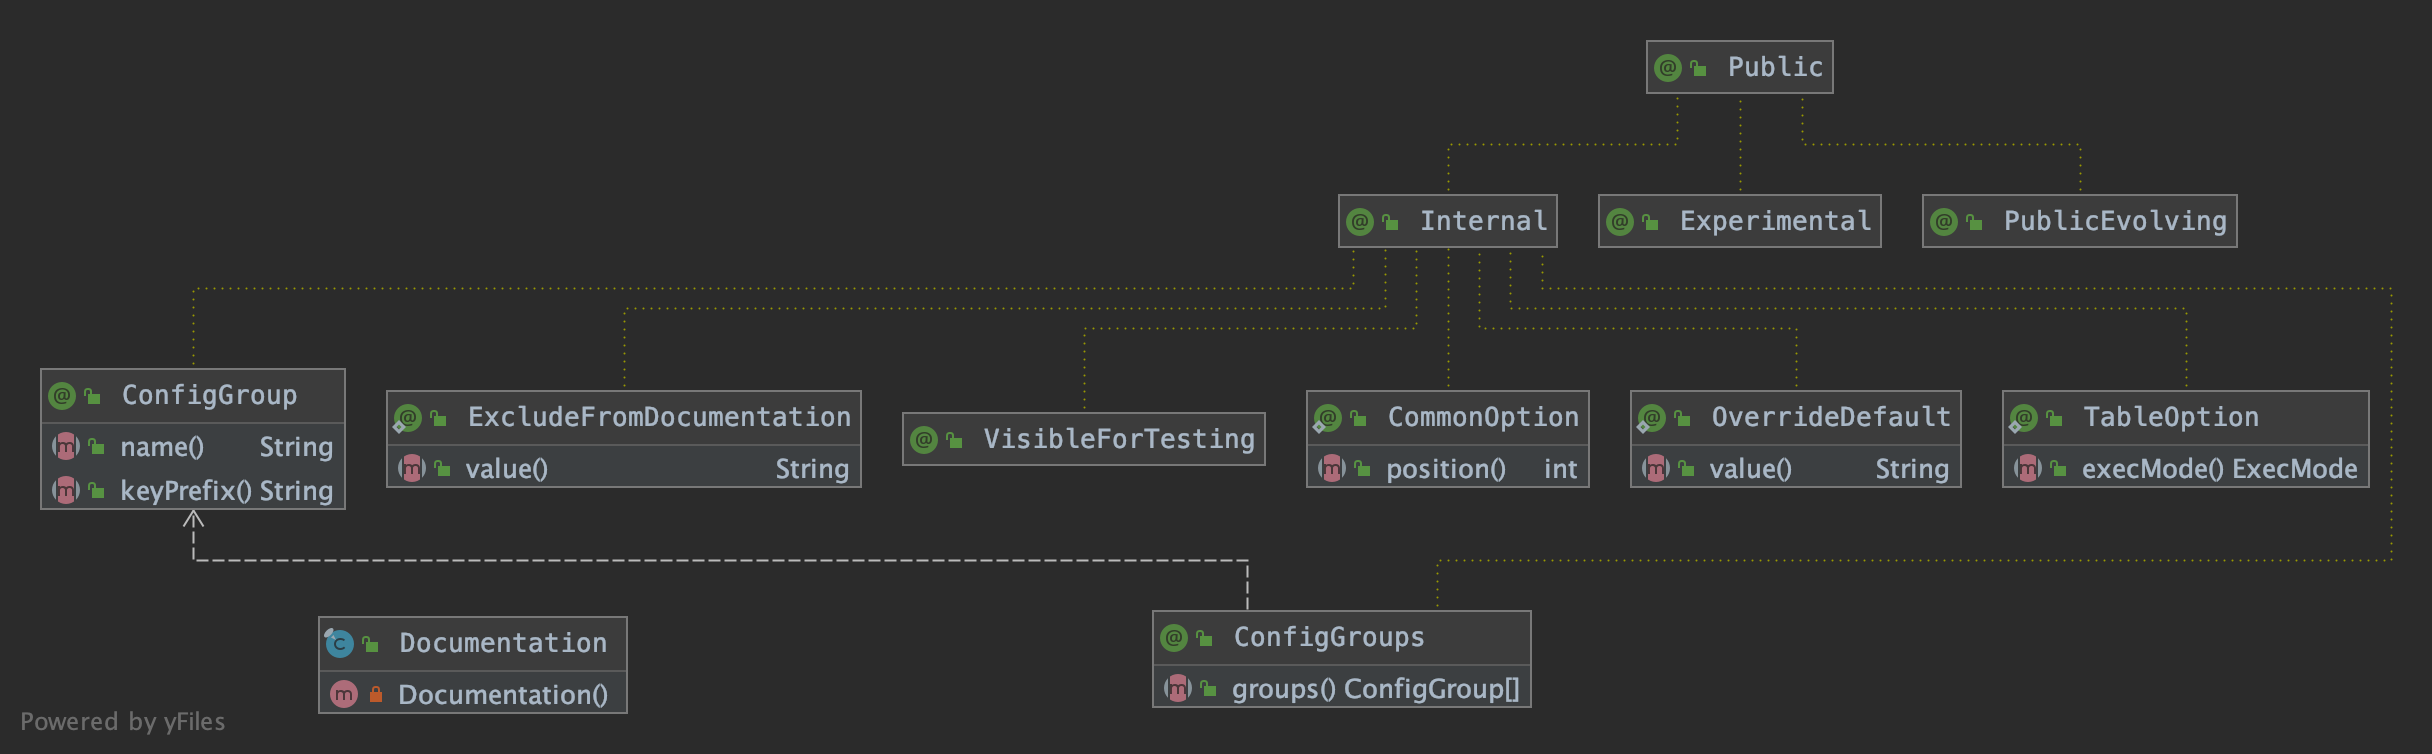
- @ConfigGroup
指定一组配置选项,组的名称将用作生成 HTML 文件名,keyPrefix 用于匹配配置项名称前缀。
如 @ConfigGroup(name = “firstGroup”, keyPrefix = “first”),生成的 HTML 文件名为 firstGroup ,其中的配置项名称都是以 first 开头的。
1 | ({}) |
- @ConfigGroups
允许一个配置类中的配置项可以按照配置项名称前缀分成不同的组,生成多个 HTML 文件。
如:
@ConfigGroups(groups = {
@ConfigGroup(name = “firstGroup”, keyPrefix = “first”),
@ConfigGroup(name = “secondGroup”, keyPrefix = “second”)})
可以从配置类生成 3 个 HTML 文件,分别为 firstGroup、secondGroup、default,具体可以接着往下看,下面会有示例说明。
1 | (ElementType.TYPE) |
下面通过一个示例来说明这两个注解的用途。
查看测试类 ConfigOptionsDocGeneratorTest 中应用到 @ConfigGroups 和 @ConfigGroup 的单测 testCreatingMultipleGroups:
1 |
|
TestConfigMultipleSubGroup 类 mock 了一个配置项类:
@ConfigGroup(name = “firstGroup”, keyPrefix = “first”) 将 key 以 first 开头的 ConfigOption 归为 firstGroup,
@ConfigGroup(name = “secondGroup”, keyPrefix = “second”) 将 key 以 second 开头的 ConfigOption 归为 secondGroup。
1 | (groups = { |
我们再看下 ConfigOptionsDocGenerator.generateTablesForClass(Class<?> optionsClass)
1 |
|
运行单测 testCreatingMultipleGroups 的输出结果如下:
firstGroup 配置项组里的配置项名称都是以 first 为前缀的。
1 | <table class="table table-bordered"> |
secondGroup 配置项组里的配置项名称都是以 second 为前缀的。
1 | <table class="table table-bordered"> |
TestConfigMultipleSubGroup 中的其他配置项都是没有分组的,默认都放到 default 组中。
1 | <table class="table table-bordered"> |
Documentation 类中定义了修改文档生成器行为的注解结合,包括 @OverrideDefault、@CommonOption、@TableOption、@ExcludeFromDocumentation。下面依次介绍。
- @Documentation.OverrideDefault
作用在 ConfigOption 上的注解,覆盖其默认值。
1 | (ElementType.FIELD) |
下面通过一个示例来说明这个注解的用途。
查看测试类 ConfigOptionsDocGeneratorTest 中应用到 @Documentation.OverrideDefault 的单测 testOverrideDefault:
1 |
|
TestConfigGroupWithOverriddenDefault 类 mock 了一个配置项类,每个配置项都使用了 @Documentation.OverrideDefault 注解覆盖配置项的默认值。
1 | static class TestConfigGroupWithOverriddenDefault { |
运行单测 testOverrideDefault 的输出结果如下:
将 firstOption 的默认值覆盖成了 default_1,secondOption 原先没有默认值,被设置成了 default_2。
1 | <table class="table table-bordered"> |
- @Documentation.CommonOption
作用在 ConfigOption 上的注解,使其包含在 “Common Options” 片段中,
按 position 值排序,position 值小的配置项排在前面。
1 | (ElementType.FIELD) |
下面通过一个示例来说明这个注解的用途。
查看测试类 ConfigOptionsDocGeneratorTest 中应用到 @Documentation.CommonOption 的单测 testCommonOptions:
1 |
|
TestCommonOptions 类 mock 了一个配置项类:
COMMON_OPTION 使用了 @Documentation.CommonOption 注解,position 使用默认值为 Integer.MAX_VALUE,
COMMON_POSITIONED_OPTION 也是用了 @Documentation.CommonOption 注解,position 值指定为2,这个配置项肯定排在 COMMON_OPTION 前面。
1 | public class TestCommonOptions { |
运行单测 testCommonOptions 的输出结果如下:
1 | <table class="table table-bordered"> |
- @Documentation.TableOption
作用于 table 配置项上,用于添加元数据标签,配置执行模式(批处理、流式处理、两者兼有)。
1 | (ElementType.FIELD) |
我们看下 ConfigOptionsDocGenerator 类中的 toHtmlString 方法:
1 | private static String toHtmlString(final OptionWithMetaInfo optionWithMetaInfo) { |
- @Documentation.ExcludeFromDocumentation
作用于 ConfigOption 配置项,用于从最终生成的 HTML 文档中移除配置项。
1 | (ElementType.FIELD) |
下面通过一个示例来说明这个注解的用途。
查看测试类 ConfigOptionsDocGeneratorTest 中应用到 @Documentation.ExcludeFromDocumentation 的单测 testConfigOptionExclusion:
1 |
|
TestConfigGroupWithExclusion 类 mock 了一个配置项类:
excludedOption 使用了 @Documentation.ExcludeFromDocumentation 注解,在生成的 HTML 文档中它将被移除。
1 | static class TestConfigGroupWithExclusion { |
运行单测 testConfigOptionExclusion 的输出结果如下:
1 | <table class="table table-bordered"> |
其他标记注解
关于这几种标记注解,源码中暂时还没有找到相关测试用例,后续补充。
- @Experimental
表示标记对象是试验使用的注解,带有此注解的类是没有经过严格测试和不稳定的,可能在以后的版本中被修改或移除。
1 |
|
- @Internal
将稳定的公共的api注解为内部开发者api,内部开发者api是稳定的,面向Flink内部,可能随着版本变化。
1 |
|
- @Public
标注类为开放的,稳定的。
类、方法、属性被这个这个注解修饰时,表示在小版本迭代(1.0,1.1,1.2)中,都维持稳定,应用程序将根据同一大版本进行编译。
1 |
|
- @PublicEvolving
带有此注解的类和方法用于公共使用,并且具有稳定的行为。但是,它们的接口和签名不被认为是稳定的,并且当跨版本时可能会变化。
1 |
|
- @VisibleForTesting
标注有些方法、属性、构造函数、类等在 test 阶段可见,用于测试。
例如,当方法是 private 的,不打算在外部去调用的,但是有些内部测试需要访问它,所以加上 VisibleForTesting 注解进行内部测试。
1 |
|